

A monitor arm for a glass desk may work in some setups, but a glass or fragile-looking desktop should always be treated as a stop-and-verify condition. The answer to “can you mount a monitor arm on a glass desk?” depends on the desk’s construction, the mounting geometry, and the arm’s instructions. Don’t rely on appearance, a desk protector, or a wider pad as proof that the surface can withstand clamp pressure. First confirm the desk’s construction and the arm’s instructions, then inspect the mounting geometry: usable edge thickness, flat top-and-bottom contact, rear clearance, underside access, and any cable tray or frame. If a required detail is unknown, pause and verify it with the desk or arm manufacturer rather than testing by tightening harder.

Glass Desk Monitor Arm Compatibility Starts With the Surface
The real question is whether the desk provides a documented, stable connection for the selected arm—not simply whether the desktop looks sturdy. Surface material, edge geometry, and hidden obstructions can change the answer. Discussions about a monitor arm on a glass desk show why this is a surface-specific question, not a universal yes-or-no rule.
Glass Tops and Fragile Surface Materials
A glass top with unknown construction should remain unverified until the desk documentation and the arm documentation support the proposed mounting method. This does not mean every glass desk is automatically unsafe, and it does not mean tempered glass is automatically approved for a monitor arm. It means the available information is not enough to make a blanket compatibility decision.
A clamp concentrates force at the mounting area. A protector or pad may change the contact surface or reduce cosmetic concerns, but it cannot establish that the desk structure is designed to accept that force. A community discussion about clamping to tempered glass reflects a common reader concern, but it is not a substitute for the desk maker’s instructions. If the desk maker does not address monitor-arm mounting, ask whether the proposed location and method are approved, or choose another mounting location with clearer documentation.

Use these three outcomes:
- Documentation confirms suitability: Continue to the arm, monitor, clearance, and cable checks.
- Documentation is missing or contradictory: Pause and contact the desk or arm manufacturer with the exact model and mounting method.
- The surface or connection appears fragile, uneven, or unsupported: Stop using that mounting point and consider a documented alternative.
Thin Tops and Beveled Desk Edges
For a thin desktop or a monitor arm for a beveled desk edge, inspect the top and bottom edge—not just the visible top surface. Both clamp jaws need a flat, supported contact path, and the clamp must not rock, catch only a narrow lip, or depend on excessive tightening to stay in place.
Record the usable thickness at the exact mounting point and compare it with the current arm listing or installation guide. The supplied product information for the referenced Eureka arms lists a table-thickness range of 0.4 to 3.5 inches, while other purchase guidance shows a narrower range. Because those figures conflict, do not treat either as a universal pass/fail threshold; verify the current page and manual for the exact model. A retailer Q&A about desktop lip measurements is useful only as a product-specific measurement example.
If the bevel prevents full contact, the edge changes thickness, or the arm instructions do not clearly cover the profile, treat the setup as unverified. A clamp that sits unevenly is not made suitable by tightening it further.
Rear Lips, Frames, and Cable Trays
A monitor arm for a desk with a cable tray needs more than open space on top. Inspect the path of the clamp body, the lower pad, and the tightening mechanism behind and below the desktop. A rear lip, frame, drawer, crossbar, or tray may prevent the hardware from reaching the desk or force it into an uneven position.
Check the proposed location in this order:
- Look for a rear lip, frame, drawer, or other obstruction.
- Measure the open space behind and below the desktop at that point.
- Confirm that the lower pad and clamp body can sit where the arm instructions show.
- Check whether the cable tray conflicts with the hardware or blocks access.
- Identify another mounting point if the obstruction remains unresolved.
Don’t treat a cable tray as structural reinforcement. It may organize cables, but its presence does not prove that the desktop or frame can support a monitor arm.
Clamp or Grommet: Which Mount Fits the Desk?
A clamp and a grommet use different connection paths. A clamp grips a supported desk edge; a grommet passes through a suitable hole and relies on the surrounding material, underside access, and matching hardware. Neither is universally safer for every glass or unusual desk.
| Mount type | Connection requirement | Desk changes | Obstruction risks | Checks before purchase | Stop condition |
|---|---|---|---|---|---|
| Clamp | A flat, supported edge with usable thickness and underside clearance | Usually no drilled hole, but the edge must accept the hardware shown in the instructions | Rear lips, frames, drawers, cable trays, and bevels can block the clamp or lower pad | Measure the edge, top-and-bottom contact, rear opening, underside access, and exact arm requirements | The clamp rocks, contacts unevenly, cannot reach the underside, or requires forceful tightening to compensate |
| Grommet | A suitable hole with adequate surrounding material, access, and compatible hardware | Uses an existing hole or requires creating one only when the desk and instructions allow it | The hole may be too small, misplaced, unreinforced, or blocked underneath | Check hole dimensions, surrounding structure, underside access, hardware fit, and whether the hole was intended for structural mounting | The hole is only a cable passage, the surrounding material is unknown, or the hardware cannot seat as instructed |
The grommet vs clamp mount decision should start with the desk feature you can verify. An existing hole is a candidate, not automatic approval. Likewise, a visible desk edge is not enough if a frame or tray prevents complete contact.
The listed Eureka single monitor arm and dual monitor arm fact sheets identify C-clamp and grommet installation methods. Those mounting options describe the available hardware paths; they do not confirm compatibility with a specific glass desk.
A Pre-Purchase Fit Check for Unusual Desks
Before putting an arm in your cart, create a short measurement record for the exact mounting point. This method is useful for monitor arm compatibility for unusual desks because it separates desk fit from monitor fit.
- Choose the mounting point. Mark the location you actually plan to use. Don’t judge the desk from its overall appearance; a rear corner and a front edge may have different frames, lips, or tray access.
- Identify the surface and edge. Record whether the top is glass, wood, laminate, metal, or another material. Note whether the edge is flat, rounded, beveled, framed, or interrupted.
- Measure the usable thickness and contact area. Measure where the clamp would sit, including the bottom edge profile. For a grommet, record the hole dimensions and the material around it. Compare these details with the exact product page and installation guide.
- Inspect rear and underside clearance. Photograph or measure the open space behind and below the desktop. Include drawers, rails, frames, cable trays, and anything that could block the clamp body or tightening hardware.
- Verify the monitor requirements. Check the display’s VESA pattern, weight, count, and planned reach against the selected arm’s documentation. These are separate from the desk connection.
- Plan movement and cables. Make sure the arm can move through the intended range without pulling on the mount, striking the wall, or creating cable tension. Leave enough slack for adjustment.
- Resolve documentation gaps before purchase. If the surface, thickness, hole, edge profile, or obstruction is not addressed—or if product information conflicts—ask the relevant manufacturer for a written answer. Don’t turn an unknown measurement into a trial installation.
You can also review under-desk cable management for routing ideas, but cable organization should come after the mounting connection passes inspection. It cannot solve an unsuitable contact path.
Match the Arm to the Monitor Setup
Passing the desk check is only the first gate. The monitor count, attachment pattern, supported monitor range and load, arm reach, movement, and cable path must also match the selected hardware.
Single-Monitor Layouts
For a single display, compare the monitor’s VESA pattern and weight with the arm’s current specifications. The supplied Eureka single-arm facts list support for most 17–32-inch monitors, up to 17.6 pounds, and 75x75 mm or 100x100 mm VESA patterns. Confirm those details on the current listing or manual before purchase.
Then check reach. A monitor that technically fits the attachment plate can still create a problem if the arm must extend so far that movement pulls against the mounting point. Plan the cable path for the full adjustment range rather than routing cables tightly at the starting position.
Dual-Monitor Layouts
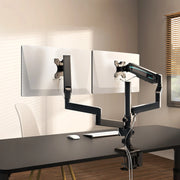
A dual-display arrangement needs a separate layout check; don’t turn a single-monitor load statement into a combined-load conclusion. Compare both displays and the planned arm arrangement with the exact dual-arm documentation.
| Check | What to verify |
|---|---|
| Display count | The arm is documented for the intended number of monitors. |
| VESA pattern | Each display matches a listed attachment pattern. |
| Monitor load | Each display and the combined arrangement are addressed by current documentation. |
| Reach | The arm can place both screens where intended without excessive extension. |
| Rear clearance | The hardware and screens clear the desk lip, wall, frame, and tray. |
| Movement space | Tilting, swiveling, and height adjustment do not create contact or pulling forces. |
| Cable routing | Both sets of cables have slack and do not tug on the arm. |
The supplied Eureka dual-arm facts list most 17–32-inch monitors, up to 17.6 pounds, 75x75 mm or 100x100 mm VESA patterns, and C-clamp or grommet installation. They do not establish a combined dual-monitor limit or prove that a particular glass or unusual desk is suitable.
Cable Routing Without Hiding the Mounting Problem
Route cables only after the connection passes inspection:
- Leave slack for the arm’s planned movement.
- Check that cable tension does not pull sideways on the mount.
- Keep the connection visible during initial movement and adjustment checks.
- Don’t use a cable tray to conceal an uneven clamp, blocked hardware, or uncertain desk structure.
Stop, Verify, or Proceed: The Final Mounting Checklist
Use this as a conservative decision framework, not as a formal engineering standard. The goal is to avoid improvising when a required material, dimension, or connection detail is unknown.
Proceed when:
- The desk surface and construction are documented as suitable for the proposed method.
- The clamp or grommet hardware can sit fully and evenly as shown in the instructions.
- Edge thickness, hole details, rear clearance, and underside access match the exact arm documentation.
- The monitor attachment, supported load, movement, reach, and cable path also fit.
- The installation does not depend on over-tightening or forcing hardware around a tray, frame, or bevel.
Verify when:
- The desk is glass or fragile-looking and its mounting approval is unclear.
- The thickness, hole size, surrounding material, or underside clearance is unknown.
- A rear lip, drawer, frame, or cable tray may interfere.
- The product page and installation guide show different dimensions, including the conflicting thickness guidance noted above.
- Contact the desk or arm manufacturer with the exact model, photos, measurements, surface material, and proposed mount type.
Stop when:
- The clamp rocks, touches unevenly, or cannot reach a supported underside.
- The glass construction is unverified and the installation would rely on guesswork.
- Hardware conflicts with a tray or frame and cannot be relocated without creating another problem.
- The planned solution depends on tightening harder to compensate for poor contact.
If the location fails, look for another documented mounting point or consider a freestanding stand. That alternative avoids the desk clamp or grommet, but it still requires checks for footprint, desk stability, monitor fit, and available work area. If any compatibility field remains unknown, compare the exact desk and arm documentation or contact the manufacturer before purchase or installation.
FAQs
These questions address less-obvious conditions that can change the installation decision. Use the exact desk and arm documentation whenever an answer depends on a dimension, material, or structural condition.
Can a Monitor Arm Be Mounted Through an Existing Desk Grommet?
Possibly, but the hole is only a candidate. Check its diameter, the material around it, underside access, any reinforcement, and whether the arm’s hardware can seat as instructed. A hole designed for cable passage may not have the structure or position required for a monitor arm.
How Should You Measure a Desk Before Buying a Monitor Arm?
Take photos and measurements at the proposed location, including surface material, top thickness, edge profile, rear and underside clearance, and grommet details if relevant. Also record monitor weight, VESA pattern, display count, and intended cable movement. Compare each detail with the exact product page or manual before adding the arm to your cart.
Can a Desk Protector Make a Glass Desk Safe for a Monitor Arm?
A protector cannot establish structural compatibility or replace manufacturer confirmation. It may alter contact or reduce cosmetic concerns, but it cannot fix an unsuitable edge, concentrated pressure point, unsupported glass construction, or blocked underside. If the desk remains undocumented for the proposed mount, use another location or ask the manufacturer.
What Should You Do If the Monitor Arm Conflicts With a Cable Tray?
Don’t force the hardware around the tray or remove it before checking the desk and cable-routing consequences. Look for another mounting point with clear access, and confirm that repositioning the tray will not interfere with the arm. If clearance remains uncertain, send the manufacturer photos and measurements before installation.
Is a Freestanding Monitor Stand Better When Desk Mounting Is Unclear?
It can avoid clamp pressure and grommet hardware, but it is not automatically safer for every setup. Check the stand’s footprint, monitor attachment, available work area, and the desk’s stability on that surface. If the stand or monitor fit is also unclear, verify those details before switching methods.


Leave a comment