

Before delivery, standing desk assembly preparation should cover more than an open floor. Clear the route into the room and a separate staging area, check the model manual for tools and hardware, arrange help if components are large or awkward, and decide the desktop orientation and electronics layout in advance. Exact package dimensions, fasteners, orientation options, and movement checks vary by model, so use this guide as a standing desk assembly checklist—not a replacement for the instructions supplied with your desk.

Standing Desk Assembly Preparation: Clear Floor Space and the Delivery Path
Prepare both the path the boxes will take and the area where you will unpack and assemble the desk. Compare doors, turns, stairs, elevators, and the available staging area with the packaged dimensions when the model provides them; there is no single floor-space number that fits every desk. General furniture assembly guidance also supports planning the route and work area before you begin.
- Walk the delivery route. Check the entry door, interior doors, tight turns, stairs, elevator access, and the point where the package will first be set down. Move baskets, chairs, rugs, and other items that could block a turn or create a trip hazard.
- Separate the route from the work area. Clear a nearby staging area for the desktop, frame pieces, control components, hardware, instructions, and packaging.
- Test the intended footprint. Use painter's tape or temporary markers to outline the desktop and surrounding area. Check walls, doors, radiators, filing cabinets, and walking paths before final placement. For a room-fit follow-up, use room planning with tape.
- Protect the floor and choose storage. Use a suitable flat covering where boxes or frame parts will rest. Decide where small hardware and opened packaging will go so parts stay off the floor and out of the route.
If package dimensions are unavailable, check the delivery documentation, product manual, or support channel before delivery day, particularly for a large desktop or narrow access points.

Prepare the Manual, Tools, and Hardware
The model manual should determine the assembly sequence, hardware identification, and permitted tools. Before opening the boxes, have the instructions accessible and prepare an organizer, but do not assume a universal screwdriver, hex key, powered tool, or thread treatment suits every standing desk.
Check the Model Manual First
Locate the manual and any model-specific setup or delivery instructions. Confirm the parts list, fastener labels, assembly order, warnings, and tool requirements before combining components. Assembly-instruction research explains why clear sequencing and relevant diagrams help with part identification, but it does not replace the manual for your desk.
Use the manual to answer these questions:
- Which frame, desktop, control box, legs, brackets, and accessories are included?
- Which fasteners belong to each step?
- Which tools are included, and which additional tools are permitted?
- Does the model specify an orientation, calibration step, cable path, or inspection procedure?
If an instruction is unclear, compare the diagram with the labeled part instead of substituting a generic guide. If the manual and package contents appear inconsistent, document the difference and contact support before modifying a part.
Organize Hardware Before Assembly
Use a small tray or labeled containers to group fasteners by the manual's step or label. Keep included tools separate from optional tools, and leave unidentified hardware together until the instructions tell you where it belongs.
- Inventory the boxes and compare major components with the manual.
- Match fasteners to the manual's labels or diagrams.
- Place each group in a separate container or marked section.
- Keep the manual and order information within reach.
- Retain documentation and packaging until the initial inspection is complete.
A model-specific standing desk setup prep list is more reliable than a generic tool kit. A tool that works for one model may be unnecessary, disallowed, or a poor fit for another.
Set Up a Controlled Workstation
Create a work zone with good lighting, a clear surface for the manual and hardware, and a defined place for waste packaging. Keep pets, children, and active walkways away while parts are handled. Set electronics aside until the frame and desktop are stable.
- Keep the manual or support device visible without placing it where parts may damage it.
- Use labeled hardware containers and a separate spot for parts awaiting inspection.
- Keep the work area away from pets, children, and active walkways.
- Leave electronics disconnected until the layout and frame are stable.
This setup improves organization; it does not prove that assembly will be easy or that the same tools apply to every model.
Plan Help for Larger, L-Shaped, and Accessory-Integrated Desks
Arrange a second person before delivery when a desktop, frame, or package is large, awkward, or difficult to stabilize. An L-shaped configuration can make rotation and orientation more complicated, but the shape alone does not establish a universal two-person requirement. Check the model instructions, package information, delivery location, and actual handling situation. A community discussion about standing-desk assembly is useful only as a signal that helper planning can be model- and person-dependent.
| Desk situation | Preparation concern | Helper planning |
|---|---|---|
| Standard rectangular | Package size and room for staging still vary | Arrange help if a component is bulky or hard to control comfortably |
| Large rectangular | A longer desktop or frame may need more room to turn | Check the manual and handling conditions before deciding to work alone |
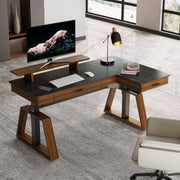
| L-shaped | Rotation, alignment, and left/right placement may be more involved | Use a second person when components are large, awkward, or difficult to stabilize |
| Accessory-integrated | Drawers, controls, or cable features can add parts and layout decisions | Arrange help when added components increase awkwardness or the manual calls for assistance |
If a component cannot be controlled comfortably, stop and reassess instead of forcing the next step. This is a planning decision, not a lifting threshold. For browsing only, you can compare an L-shaped desk option, but that link does not replace the instructions for the desk you purchased.
Stage Packaging and Confirm the Layout
Keep boxes and parts organized until you have checked condition, contents, fit, and basic function. Use this short standing desk delivery prep sequence before final tightening:
- Retain packaging and labels through the initial inspection.
- Inventory parts and photograph visible damage.
- Mark the intended desktop orientation and room footprint.
- Check walls, furniture, outlets, and walking paths.
- Compare the layout with the model instructions before tightening.
Keep Boxes and Parts Accounted For
- Group components according to the manual.
- Keep small brackets, fasteners, control parts, and accessory pieces with their labels.
- Photograph damage or shortages before combining hardware.
- Keep relevant packaging and contact the seller or manufacturer if something is missing or inconsistent.
Confirm Desktop Orientation Before Tightening
| Check | What to verify |
|---|---|
| Room-facing side | Mark the intended edge with removable tape. |
| L-shaped orientation | Follow the manual; do not assume the sides are reversible. |
| Nearby clearance | Check walls, doors, furniture, outlets, and walking paths. |
| Accessories | Do not drill or attach permanently until placement is confirmed. |
Plan Electronics, Accessories, and Cable Routing
Prepare the power and accessory layout before assembly, but wait to secure cables until the desk is stable. Check outlets, the intended power-strip location, accessory clearance, and the cable path through the desk's intended movement. General guidance on planning a standing-desk power layout can help frame the decision, but it does not establish electrical rules or universal clearances.
- Identify the nearest practical outlet and a power-strip location that does not block a walkway.
- Mark zones for monitors, a keyboard, a riser, drawers, controls, and other accessories.
- Check each item against the specific desk's frame, edge, wall, and furniture clearance.
- Confirm any integrated outlets, USB ports, drawers, or cable features in the model documentation.
Map Power and Accessory Locations
Verify that each item is compatible with the specific desk. A feature shown in another listing is not proof that it fits your model.
Leave Cable Slack for Movement
Route cables only after the frame and desktop are stable. Leave enough slack for the desk's intended movement without allowing cables to drag, snag, cross a walkway, or pull against a connection.
- Place electronics in their intended zones.
- Check the cable path and outlet or power-strip position.
- Perform the movement or control check specified by the model.
- Look for tension, snagging, or contact with the frame.
- Secure cables only after the arrangement remains clear.
Magnetic cable ties may be relevant for later organization, but no cable tie or mounting method is universally required.
Inspect the Desk Before Loading It With Gear
Before adding monitors, computers, or other equipment, compare the finished desk with the model instructions. Inspect parts and condition first, then alignment, fasteners, desktop fit, cable clearance, and any specified movement or control procedure.
- Check parts and damage. Confirm visible components are present and look for damage.
- Review alignment. Compare the frame, desktop, brackets, and accessories with the manual.
- Check fasteners. Confirm the correct fasteners are in the intended locations; do not force one that does not fit.
- Inspect desktop fit. Look at edges, joints, brackets, and contact points for mismatch or interference.
- Review cable clearance. Make sure cables do not catch on the frame or become taut during the movement check specified by the model.
- Follow the model's function procedure. Use only the movement, control, calibration, or electrical checks specified by the instructions.
- Document problems. Photograph missing, damaged, or misaligned parts before modifying anything.
If a part does not fit, a fastener will not align, or movement does not behave as described, stop rather than forcing a correction. Contact support and avoid loading the desk with gear until the issue is resolved.
FAQs
These answers cover model-dependent decisions that a general checklist cannot settle. Use the manual, package documentation, and support channel when the answer depends on the desk you ordered.
What Tools Do I Need to Assemble a Standing Desk?
The answer comes from the model manual and package contents, not a universal tool list. Check whether the desk includes a hex key or another tool, whether a substitute is permitted, and whether a powered tool is addressed. If the instructions do not clarify a tool choice, pause before using it and ask support.
Do You Need Two People to Assemble an L-Shaped Desk?
Not always. The practical trigger is whether the desktop, frame, or package is large, awkward, or difficult to stabilize, along with what the manual says. Arrange help before delivery when those conditions apply. Do not assume the L shape alone decides the answer or proceed with a component you cannot control comfortably.
How Much Space Should I Clear Before Standing Desk Delivery?
Clear both the route from the delivery point to the room and a nearby staging area for unpacking and parts. Compare them with the model's packaged dimensions when available, including doors, turns, stairs, and elevators. If those dimensions are missing, ask for them instead of relying on a universal clearance estimate.
Should I Keep the Standing Desk Packaging After Delivery?
Yes, until you verify the parts, condition, fit, and basic function. Keep damaged labels or boxes long enough to photograph and document a shortage or defect, then follow the seller's or manufacturer's process. The model's return or support instructions may set additional requirements, so check them before discarding packaging.
How Do I Know Whether My Desk Layout Will Fit Before Assembly?
Mark the desktop footprint with removable tape, then test the intended L-shaped side when the model provides an orientation choice. Check wall and furniture clearance, outlets, walking paths, accessory zones, and cable movement before final tightening. Confirm any layout-dependent accessory in the manual first.
Use This Delivery-Day Readiness Check
Use this compact scan before opening or moving the boxes. It confirms preparation; it does not replace the desk's handling, electrical, warranty, or assembly instructions.
- Route and floor: Doors, turns, stairs, elevators, walkways, and a separate staging area are checked against available package information.
- Manual and tools: The manual is accessible, hardware can be identified, and only permitted tools are ready.
- Helper and shape: You have considered whether large, awkward, L-shaped, or accessory-integrated components call for another person.
- Layout and inspection: Orientation, outlets, accessories, cable routing, packaging retention, and post-assembly checks are planned.
Before delivery, confirm the manual, route, package information, and helper plan. Then follow the specific desk's assembly, handling, electrical, warranty, and support instructions.

Leave a comment