

Pick the wall the camera will show before you touch the desk. That wall becomes your background on every call, so it should give you a simple, controllable view and light that comes from in front or slightly to the side, not from behind you. Once that wall is set, position the desk so a window or lamp never sits directly behind your face, and keep enough room to work normally when the call ends. The real test isn't how the room looks from across the room. It's what your camera preview shows at the time you actually take calls.

Choose the Camera-Facing Wall Before You Move the Desk
Sit where you'll actually take calls and look at what's behind you. That view is your background for every meeting, so choose it before you decide where the desk itself sits.
A bright window or lamp directly behind you is the clearest warning sign. It throws off the camera's light balance and can obscure your face, so rule out that wall first. Harvard's remote-teaching guidance recommends lighting yourself from the front, avoiding a window behind you, keeping the background simple, and setting the camera at or slightly above eye level.
Once you've eliminated walls with backlighting problems, compare what's left. Pick the one with the plainest, least cluttered view rather than the most decorative one. A clean wall with workable front light beats an attractive wall that leaves your face in shadow every time. This decision anchors everything else in your home office video call setup, including the window and lighting choices in the next section.
Control the Window and Choose Your Light
A window-facing desk isn't automatically the wrong call. What matters is whether the light stays manageable at the time you actually take meetings, and whether the camera preview confirms it.
Natural front light works well when a window sits ahead of you or slightly to the side and the sun doesn't create direct glare. If full sun causes problems, try blinds or change the desk orientation. In a room where daylight changes during the day, a controllable artificial source, such as a front-facing lamp, may be easier to adjust for your usual call time. Hamilton College's video conferencing guidance recommends testing a window-based setup at the same time of day as your planned call, since changing sunlight can disrupt the image, and checking the meeting preview to confirm what others will actually see.
| Light source | Choose it when | Check in the preview |
|---|---|---|
| Natural front light | A window sits ahead of you with no direct glare | Face is evenly lit, no washed-out background |
| Filtered or side daylight | Blinds or sheers help control a window that cannot move | Face stays clear without distracting glare |
| Controllable artificial light | Daylight shifts during the day or the room lacks a good window | The light remains workable at your usual call time |
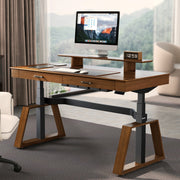
If the preview shows a dark face, hard glare, or a bright source behind you, change the desk angle or control the window before locking in the layout. Camera and workstation height also affect how the light hits your face. If you want to test different camera heights, our Prime Electric Standing Desk with RGB Lighting offers an adjustable desk height from 29.5 to 48.03 inches. It fits a setup where adjustable surface height is part of your placement needs; choose another desk if you do not need that adjustment.
Build a Background You Can Keep Clear
Your goal is a background you can control, not a fully staged room. Focus on what the camera actually sees, not what a visitor would notice walking past your desk.
- Open your camera preview and look at everything visible behind you, not just the wall itself.
- Move recurring clutter, laundry, paperwork, or personal storage outside the sightline so you're not resetting the scene before every call.
- Route any visible cords away from the frame. Our cable management kit is a 316-piece set with raceways, tie wraps, mounting bases, and clips built to organize power, data, and audio-video cords when they keep showing up on camera.
- Recheck the frame after adjustments. A simple background that stays clear beats a decorative one that needs constant upkeep.
Use depth as a framing check: keep your chair and face clearly separated from recurring storage, and move taller or busy items to the side or outside the frame instead of directly behind your head. This creates a simpler foreground-to-background view without relying on a fixed distance. Our background design guide shows more visual choices for depth, composition, and lighting layers when you want to refine the frame.

Preserve a Workable Path Through the Room
A good camera position still has to work once the call ends. Check these four points from your actual seated position before you finalize anything:
- Chair: Pull it out fully. Make sure it clears the desk and any nearby furniture.
- Workstation: Confirm your monitor, keyboard, and outlets stay within easy reach.
- Storage: Reach for the drawers, shelves, or bins you use daily without standing up or stretching.
- Room path: Walk the room's normal route. The desk shouldn't create a daily obstacle.
If the cleanest camera background blocks any of these, choose the next-best wall instead. A slightly less polished view that keeps your workday functional is the better trade.
Adapt the Layout for Small, Bedroom, and Multipurpose Rooms
The lighting and background rules stay the same everywhere. What changes is how much room constraints let you apply them.
- Small room or apartment: Prioritize the cleanest controllable sightline over a centered desk. An off-center position is fine if it keeps the chair and path clear.
- Bedroom or guest room: Control what's visible rather than redesigning the room. Move personal storage or bedding out of frame and let the rest of the room stay as is.
- Multipurpose room: Favor a layout you can reset quickly after calls. Avoid a desk position that permanently blocks the room's other use.
- Window-constrained room: Apply the light-control choice from the earlier section and use the time-matched preview to pick the least problematic angle.
Run a Five-Minute Video Preview Before You Commit
Test the exact setup you're about to make permanent, using your real chair, desk position, and camera height.
- Sit down and open your meeting app's camera preview.
- Check your face for glare, shadows, or a bright source behind you.
- Scan the full frame for clutter, cables, or storage that crept back into view.
- Confirm you can still pull out the chair, reach your workstation, and walk the room's normal path.
- If daylight in the room changes during the day, repeat this preview around your usual call time before finalizing the layout.
Stanford's video conferencing guidance recommends avoiding backlighting from windows or lamps, closing blinds when a window makes you harder to see, checking your surroundings, and testing before the call. Once the preview passes, you're set: camera-facing wall chosen first, controllable light in front or slightly to the side, a simple background, and a work path that still functions after you hang up.
FAQs
How do I hide clutter behind my desk on video calls?
Open your camera preview and remove or relocate anything competing with your face, including storage, laundry, or paperwork. Route visible cables out of frame; a cable-specific kit like our Cable Management System helps when cords are the main issue, though it works alongside a decluttered space rather than replacing that step.
Should my desk face a window for video calls?
Not automatically. Front or controllable side light usually beats a bright window directly behind you. A window-facing desk is fine only when your camera preview at the usual call time shows a clear face without glare or backlighting. If the light shifts during the day, test again before committing.
What is the best desk position for a small room?
Choose the wall with the cleanest, most controllable camera view, even if it means an off-center desk. Then confirm your chair can pull out fully and the room's normal path stays open. Don't force a centered position if it blocks daily access.
Leave a comment